Pond design worksheet
How to plan pond shelves before you dig
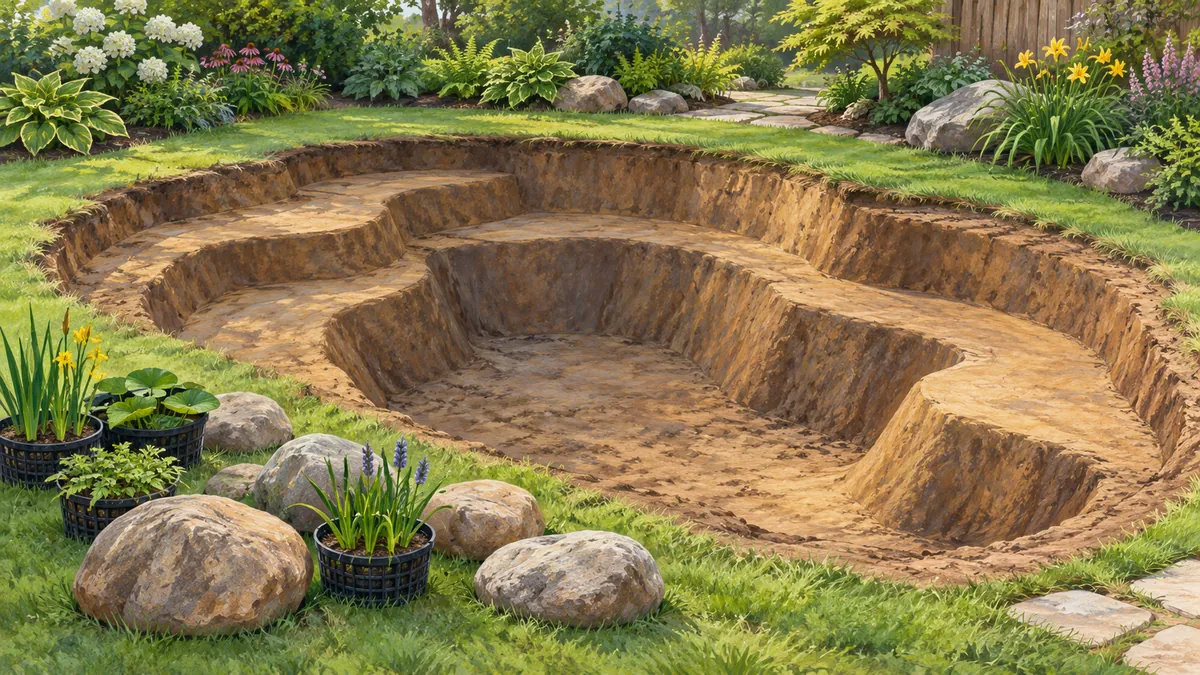
Plan each shelf for a named purpose and record its excavation depth, finished water depth and rock footprint. Shelves reduce water volume and change the excavation footprint. The worksheet uses example inputs, not recommended dimensions.
Assign each shelf a purpose
Write one job beside each shelf. Common jobs are listed here, and you can add your own.
- Planting shelf. Its finished depth comes from guidance for the named species, not from a default. Penn State Extension advises checking sunlight, water depth, hardiness and native or exotic status when choosing plants. Penn State Extension
- Waterfall corner shelf. In one TEAM Aquascape project, a shallow section at the waterfall corner let the crew build with shorter boulders than a full-depth dig would have needed. The figures belong to that installation only. TEAM Aquascape
- Fish-viewing edge. This may be a narrow shelf or none at all. Decide it from how you want to see and reach the water.
- Entry or maintenance step. Treat this as a site-specific access question and settle it separately.
If a shelf has no named job, remove it and see what the volume does.
Aquascape's contractor article covers shelf planning, site levels and equipment access as part of excavation. Aquascape Record the site levels and the route for equipment before you fix any shelf depth.
Keep three depths and one footprint apart
- Finished water depth: the water surface down to the top of whatever sits on the shelf or floor, such as rock or gravel.
- Excavation depth: the finished water depth plus everything under the water surface above the soil. That means rock, gravel, underlayment and liner as your specification defines them.
- Rock footprint: the horizontal width that rock takes at the edges and at step faces. The hole must be wider than the water footprint by this amount.
Mixing these up is how a pond ends up shallower or smaller than drawn.
Worked comparison: broad planting shelf and narrow viewing edge
Both layouts share one simplified shape: a rectangular water surface 10 ft by 8 ft, vertical walls, and a cross-section along the 10 ft length. Assumptions, all illustrative:
- Deep zone finished water depth: 3 ft.
- Shelf finished water depth: 1 ft. This is a placeholder, not a planting depth.
- Rock cover over soil on every floor: 0.5 ft, so dug depths are 3.5 ft and 1.5 ft.
- Rock at the outer walls: 1 ft thick, so the dug outline is 12 ft by 10 ft.
- Rock on the step face, liner thickness and rock voids are ignored.
| Layout | Shelf length | Deep zone length | Water volume (ft³) | US gallons | Volume lost against a flat 3 ft floor |
|---|---|---|---|---|---|
| Flat floor, reference | none | 10 ft | 240 | 1,795 | 0 ft³ |
| A: broad shelf | 3 ft | 7 ft | 192 | 1,436 | 48 ft³ (20%) |
| B: narrow edge | 1 ft | 9 ft | 224 | 1,676 | 16 ft³ (6.7%) |
Layout A: 3 x 8 x 1 = 24 ft³ for the shelf and 7 x 8 x 3 = 168 ft³ for the deep zone, total 192 ft³. Layout B: 1 x 8 x 1 = 8 ft³ plus 9 x 8 x 3 = 216 ft³, total 224 ft³. Gallons use 7.48052 US gallons per cubic foot. The gap between A and B is 32 ft³, about 239 gallons.
| Layout | Shelf zone dug | Deep zone dug | Total (ft³) | Cubic yards |
|---|---|---|---|---|
| A: broad shelf | 4 x 10 x 1.5 = 60 ft³ | 8 x 10 x 3.5 = 280 ft³ | 340 | 12.6 |
| B: narrow edge | 2 x 10 x 1.5 = 30 ft³ | 10 x 10 x 3.5 = 350 ft³ | 380 | 14.1 |
Here layout A holds 32 ft³ less water and needs 40 ft³ less digging. These numbers do not rank the layouts. The better one depends on the plants you want, how the fish are kept and what the site allows. Real step-face rock would lower both water volumes, and soil swell and haul-off are not counted.
Small ponds feel it first
A TEAM Aquascape pond kit video weighed 8 inch water depths for the top shelf and further steps against a small footprint. The installer's point was that deep shelves use up volume quickly, so be ready to change shelf depths while digging. TEAM Aquascape
Leave room to adjust the rock
On a TEAM Aquascape waterfall project, extra excavated room was left so rocks could be pulled away from the soil where the liner runs vertical, or pushed back. This was for flexibility while rocking in. TEAM Aquascape Treat any such margin as a line in your own worksheet, with a number you choose for your site.
Plant zones
For each planted shelf, record the species, the depth range stated by the guidance you name, sunlight needs, hardiness and whether it is native or exotic. Then compare the range with the shelf's finished water depth. If they disagree, change the shelf or the plant. Do not rely on a remembered figure.
Sequence before marking the site
- List every shelf with its job. Delete the ones without one.
- Look up depth guidance for each named plant and record the source.
- Write down the thickness of rock, gravel and underlayment from your own specification.
- For each shelf, enter finished water depth, excavation depth and rock footprint in separate columns.
- Calculate water volume and dug volume by hand as above. Cross-check the water figure in the volume calculator.
- Add rock footprint and working margin to the dug outline. You can sketch the outline in the PondTools app using dimensions you enter.
- Once the profile is settled, size the liner in the liner calculator. Set the calculator's overhang and optional fold allowance to suit your installation instructions; do not add the same allowance twice.
- Record every assumption, mark the placeholders, and log any depth you change during the dig.
Liner notes
The liner follows the finished excavation, shelves and steps included, so a changed shelf means a changed liner size. The PondGard EPDM guide calls for a prepared support surface and panels installed without tension, for that product. Elevate PondGard guide Another liner may differ, so check your manual.
What this worksheet leaves out
Shelf geometry here is a volume and planting question. Soil stability, retaining structures and safe access are site-specific design work and need their own review. This worksheet does not address them.
Sources
- How to Excavate a Pond the Right Way, Aquascape
- PondGard EPDM Design and Installation Guide, July 2025, Elevate
- Water for Wildlife: Bird Baths and Backyard Ponds, Penn State Extension
- 28,000 Gallons Per Hour Waterfall, TEAM Aquascape
- 20 Steps to Install DIY POND KIT - Part 2, TEAM Aquascape
- Challenges of Installing a Large Residential Pond, TEAM Aquascape