Pond Tools › The build
My 232 Gallon Pond Build
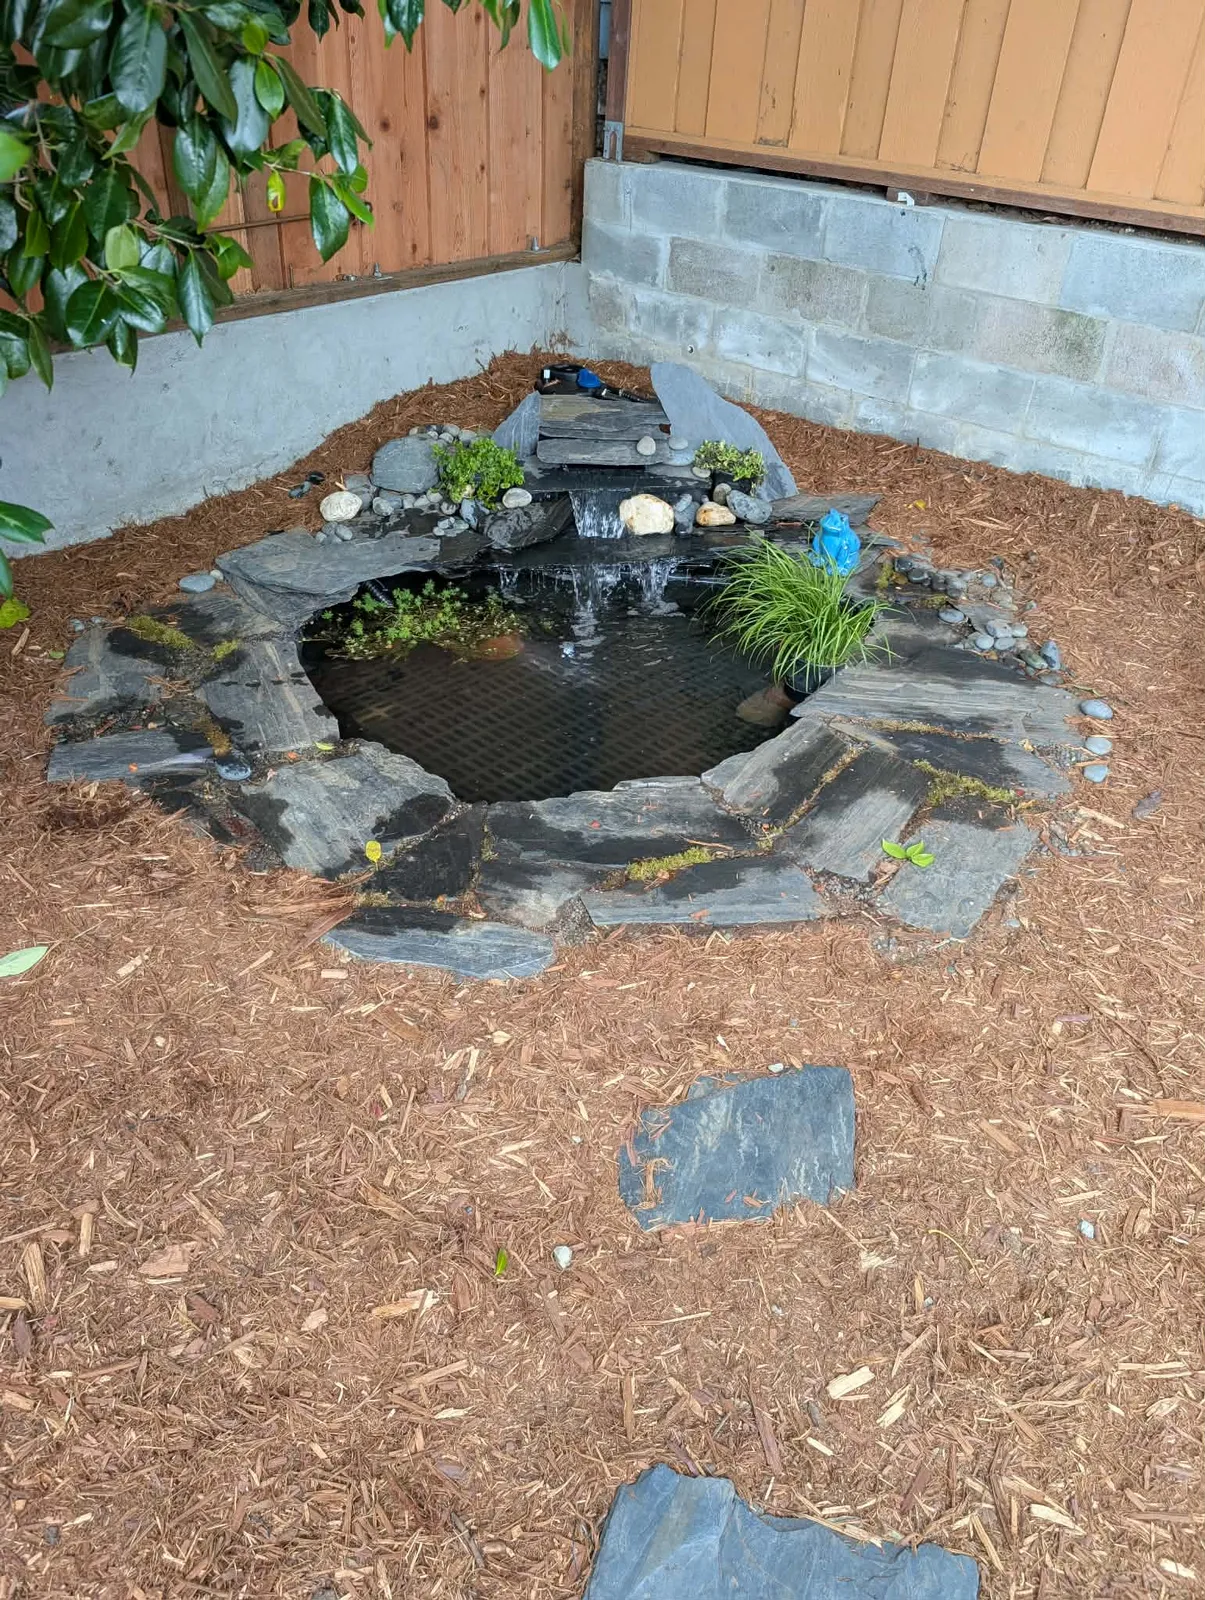
01 — The site
Zero hours of direct sun
The corner is roughly seven and a half feet square, boxed in by a cinder block retaining wall on one side and a poured concrete retaining wall on the other, with a mature loquat closing the lid overhead. It gets no direct sun at all. Not "a couple of hours in summer" — none.
That one fact drove more decisions than the dimensions did. It rules out water lilies and lotus, which want four or more hours. It rules out floating plants, which are both sun-hungry and restricted in California. It also means string algae never got a foothold, and the water stays cooler than an exposed pond of the same size would. A shaded corner is a constraint on planting and a gift on everything else.
Under the mulch there is a thin layer of topsoil and then dense clay all the way down. A perc test on a thirteen-inch-wide open hole dropped three-eighths of an inch in seven hours. That is close to impermeable — bad news for drainage around the pond, good news for the walls of the hole, which hold a vertical face while you cut them.

02 — Design decisions
Shape, depth, and the case against mortar
The finished excavation is a trilobe: a rounded main basin with a smaller lobe running off one side that houses the pump pit. Rim perimeter came out at 201 inches, maximum depth 34 inches. Theoretical volume is 232 gallons; usable volume, once you subtract the coping overhang and the inch or two at the top you never actually fill, is about 197 to 200.
Depth was the argument worth having. Anything shallower than about thirty inches in a small pond swings hard in temperature and leaves fish nowhere to go. Thirty-four inches at the centre, with a planting ledge at roughly twelve inches below the rim, gets a stable cold layer without making the hole wider — which mattered, because width was fixed by two walls that were not moving.
Everything is dry-set
No mortar in the coping, and not as a temporary measure while things settle — permanently. Two reasons. Mortar locks in mistakes: a stone set in mortar that turns out to sit a quarter inch proud is a demolition job, where a dry-set stone is a shim and five minutes. And this is clay, which moves seasonally. A rigid mortared ring on ground that swells and shrinks cracks; a dry-set ring just re-seats.
The grate is not optional
There is a toddler in the household, which makes a 34-inch hole full of water a different kind of object. The answer is a sub-surface FRP moulded grating resting on the ledge, about ten inches below the waterline. It spans the full opening, with a single six-inch access hole that also serves as the pass-through for the pump tubing. Ten inches down means it disappears visually once the water has any depth of colour to it, and it carries weight.


03 — Excavation
Hand-digging clay, and what the dirt cost
All of it came out by hand with a spade and a mattock. Dense clay digs in slabs rather than shovelfuls, which is slow but has one real advantage: the walls stand up. Vertical faces stay vertical, ledges hold their edge, and you can shape the profile precisely instead of fighting a constant slump.
A green laser line thrown across the hole gave me a working datum. The yard slopes about three inches across the length of the pond and the rim has to finish dead level regardless, so every height after this point was measured down from the laser rather than up from the ground, and the coping bed absorbed the difference.

$800
To get 2.5 tons of clay out of a back garden — $400 in fees and $400 in labour. Removing the dirt cost two and a half times what the liner and the pump cost together.
The hole gave up somewhere around 250 to 275 gallons of earth: about 1.4 cubic yards in the ground, closer to a yard and a half as a loose pile, because clay bulks up twenty to thirty per cent once you break it. Nobody's pond budget includes that line item, and it was the single biggest one.
04 — Base and screed
The sand goes under the liner
This is the part most often described backwards. The coping stones sit on a shoulder of compacted material outside the pond wall, and that shoulder is built in layers, each of which has a job.
- Scraped firm native soil — soft organic duff removed, down to where a screwdriver meets resistance
- Geotextile — stops the base rock migrating into moist clay over wet seasons
- Compacted paver base — crushed angular rock, laid and tamped in two-inch lifts
- Thin leveling sand screed — the fine adjustment layer, not a structural one
- Geotextile — cushion between screed and rubber
- EPDM liner
- Slate — set dry, directly on the liner
The sand's structural job is beneath the liner, as the screed you level the compacted base with. Sand laid on top of the liner is optional and purely cosmetic — a way to take up a hollow under one stone. It carries nothing.
The materials were nothing exotic: Sakrete Paver Base, sold as "Step 1", and Sakrete Paver Leveling Sand, "Step 2" — both national stock items in half-cubic-foot bags. The cheap all-purpose sand is the wrong thing. It is washed and rounded, so it flows rather than locks, and it keeps moving under a loaded stone.

Field note — wet ground
Crushed angular base rock compacts by mechanical interlock, not by moisture lubricating the particles. It drains freely, so it cannot really be "too wet" the way soil can — you were going to dampen it before tamping anyway. Wet ground does not stop you laying base rock. It only stops you compacting soil, which is a different problem, and one that turns up below.
05 — The falls
A block core wearing a slate skin
The waterfall sits in the back-right corner and fires diagonally across the pond toward the doorway, so it is seen face-on from where people actually stand. It stands about thirty inches of stacked black slate.
The structure is not made of stone. It is cinder block, set on compacted base rock over undisturbed ground, with slate applied as a veneer. Trying to build thirty inches of falls out of packed dirt on a corner you have just excavated is how you get a waterfall that leans into the pond over a winter. The blocks were a five-dollar decision that removed the problem.
Each course steps back as it rises. The whole thing is freestanding: it carries its load down into undisturbed ground and never rests on the cantilevered coping. The two systems are deliberately independent, because the coping is designed to be lifted and re-set.
Field note — the arris
A cinder block corner is a hard ninety-degree edge, and stiff geotextile tents over an edge like that instead of wrapping it, leaving the liner unsupported exactly where it is most stressed. I knocked the arris off the block, then laid a scrap of EPDM over the corner before the geotextile went down. Rubber on rubber conforms; fabric on a sharp edge does not.


06 — Liner and fill
Firestone PondGard, 45-mil, 15 × 15
One sheet of 45-mil EPDM, fifteen feet by fifteen, with geotextile above and below. Geotextile underneath protects the rubber from anything sharp left in the clay; geotextile over the top protects it from the slate, which is the sharper of the two hazards. Slate splits with genuinely knife-like edges.
There is no way to install a single sheet into a compound shape without folds. You get large ones, you tuck them into the least visible quadrant, and you stop fighting them. The folds set once the water arrives, and after that they are effectively permanent unless you drain and re-work them — not worth doing for something that ends up under stone.
Field note — liner sizing
The sheet finished with twelve inches of excess on one side and four feet on the other. That is a badly centred sheet and it cost nothing. Excess gets trimmed after the pond is full and settled, when you can finally see where the real waterline is. The only version of this mistake that matters is coming up short of the waterline, and that one is unrecoverable.


Field note — cloudy water
It stayed like that for weeks and the correct response was to leave it alone. Suspended clay colloids settle on their own schedule; I bought flocculant to have on hand and never opened it. What does need attention is the pump pre-filters, which load up with fine clay fast enough to starve the pump if you do not rinse them every couple of days at first.
07 — Coping
One course, cantilevered, no mortar
A single course of slate flagstone around the whole rim, each piece overhanging the water. The rules that make it work are simple and worth following exactly:
- No more than a third of any stone overhangs. Two thirds bears on the compacted shoulder behind it. Break that ratio and the stone becomes a diving board with a person's weight on the wrong end.
- Pitch the top about a quarter inch per foot away from the pond, so rain and hose water run into the garden rather than washing soil into the water.
- Set the bed height so the stone clears the poly edging lip by about half an inch. The edging is thin, and a flagstone bearing on its vertical lip will either crush it or pivot on it. The stone should never touch it.
The overhang does real work beyond looking right: it hides the liner edge, shades the margin, and gives fish somewhere to be that is not visible from above.


Field note — the flood, and doing nothing about it
A nut on the water connection at the falls was not fully tight and it let go. Something like forty gallons went straight into the ground at the waterfall corner and liquefied the clay there.
The right response was to do nothing. Saturated clay cannot be compacted — working it just remoulds it into something worse, and you cannot dry it on a schedule. So I left the corner alone and set the coping knowing the falls-side stones would settle unevenly. Because every stone is dry-set, the eventual re-level is fifteen minutes with a pry bar and a handful of sand. That is the entire argument for dry-setting, demonstrated in week one.
08 — Filtration and water chemistry
One pump, one canister, and a header full of coral
The pump is a 100-watt submersible with stepless flow control from 700 to 1800 GPH, run wide open: at 1800 GPH it turns the whole pond over about eight times an hour, which is far more than the fish need and exactly what the falls needs.
Flow goes pump → 1580 GPH pressurised biological canister → a 10-inch filtering waterfall spillway → the falls.
Splitting the biology across two places is deliberate. The canister takes the mechanical load and gets backflushed, which disturbs whatever colony lives in it every time. The spillway box at the top of the falls never gets touched: it holds crushed coral, bio-balls and rock, and does slow, undisturbed biological work in a warm, oxygen-saturated, permanently wet container. One half of the system can be cleaned without resetting the other.
The low-KH problem
San Francisco water is two things at once. It is chloraminated, and chloramine does not off-gas — leaving a bucket out overnight, which works for chlorine, does nothing here. Seachem Prime handles chlorine, chloramine, and the free ammonia that chloramine breaks into when you neutralise it.
And it is Hetch Hetchy water, which is exceptionally soft. Measured carbonate hardness came in around 20 ppm. That is not enough buffer to hold pH steady through a cycle — nitrification consumes alkalinity, and a pond with no reserve will crash its pH partway through and stall the bacteria you are trying to grow. The target is 80 to 120 ppm, and the crushed coral in the spillway box is what gets it there: it dissolves in proportion to how acidic the water is, so it self-regulates instead of needing dosing.
Cycling is fishless — bottled pure ammonia, plus seeded media where I can scrounge it from an established system, which cuts weeks off. Nothing goes in until ammonia and nitrite both read zero with nitrate present.

09 — Planting
What will grow with no sun at all
The shade constraint deletes most of the pond-plant catalogue in one move. Water lilies and lotus need four or more hours of direct sun and will not flower without it. Floating plants are both sun-hungry and, in California, largely restricted. Anything sold as "surface cover" is off the table.
What went in instead is a set of shade-tolerant marginals and one submerged oxygenator:
- Dwarf red-stem parrot's feather — Myriophyllum brasiliense 'red stem'. Fine feathery foliage, sits in the water, doubles as an oxygenator.
- Japanese sweet flag 'Licorice' — Acorus gramineus. Clumping, grass-like, takes sun or filtered shade, holds an edge.
- Water forget-me-not — Myosotis 'Southern Blues'. A more heat-tolerant selection; wants moist soil or shallow water and tolerates shade.
- Creeping Jenny — Lysimachia nummularia. Semi-evergreen spreader for the stone margin, happy to trail over the coping.
Still to come: hornwort, by the armful, as the main submerged nitrate sponge. In a pond this size plants are not decoration — they are the export path for everything the filter converts but cannot remove.

Stocking
Four juvenile shubunkin. Koi were considered and ruled out on arithmetic: every variety of koi is the same species, they want a thousand gallons or more, and there is no such thing as a dwarf koi. A 200-gallon pond that gets koi becomes a 200-gallon pond with a fish welfare problem in about two years.
10 — Where it stands
Cycling. No fish yet.
The pond is full, the falls run, the grate is in, the coping is set and the margins are planted and mulched to the walls. The water cleared on its own, after weeks of being opaque.
What is left:
- Finish the cycle and prove it — ammonia and nitrite at zero with nitrate present, held across several days, not one good reading.
- Bring KH up to 80–120 ppm and confirm it holds there through the cycle rather than sagging.
- Get hornwort in and let it establish before there is any bioload to handle.
- Re-level the falls-corner coping once that ground has genuinely dried out.
- Then, and only then, four juvenile shubunkin.
It is not finished, and calling it finished at the point where it starts to photograph well would be the wrong lesson to take from it. A pond is finished when it holds fish safely.
Specification
- Theoretical volume
- 232gal
- Usable volume
- 197gal
- Max depth
- 34in
- Rim perimeter
- 201in
- Planting ledge
- 12in down
- Grate depth
- 10in down
- Falls height
- 30in
- Spoil removed
- 2.5tons
Materials
What it is made of
This is what the pond has cost, off the receipts — ordered online first, then everything bought in person. California sales tax is folded into the in-person figures.
Also bought and returned: a 10 × 15 Firestone liner ($171.63) once the volume maths said it would not reach, and 20 ft of 1¼-inch tubing ($27.99) after the plumbing settled on 1-inch.
Bought in person
| Black slate flagstone — 503 lb at $0.79/lb, Broadmoor Landscape Supply, South San Francisco | $436.61 |
| Sakrete Paver Base "Step 1" — 12 bags at $6.25, Daly City | $82.41 |
| Seachem Prime and an API liquid master test kit — a shop in the city | $54.00 |
| River rock — from a neighbour on Nextdoor | $40.00 |
| Sakrete Paver Leveling Sand "Step 2" — 3 bags at $7.28 | $24.00 |
| Landscape staples, 100-pack — for pinning the edging | $10.52 |
| Bought in person | $647.53 |
Field note — the 500-pound line
Slate was $1.09 a pound under 500 lb and $0.79 a pound at 500 and over. I bought 503 lb, which is not an accident: at $0.79 that is $397, where the same 503 lb one pound under the break would have been $548. A $151 difference for crossing a line.
The useful version for anyone else: once you need more than about 365 pounds, buying 500 is cheaper in absolute terms than buying what you actually need. Work out where your yard's break sits before you load the car, not after.
The whole thing
| Ordered online | $1,015.19 |
| Spoil disposal — $400 fees, $400 labour | $800.00 |
| Bought in person | $647.53 |
| Spent so far | $2,462.72 |
Two things stand out in that. The 45-mil EPDM sheet is the single most expensive object in the pond and worth every dollar of it — the one component with no acceptable failure mode. And the $800 bought nothing at all: it is purely the cost of moving clay from inside a fenced back garden out to the kerb. The dirt I took out cost almost twice as much as the stone I put back.
Still to come
| Four juvenile shubunkin | $40 |
| Hornwort, by the armful | $15 |
| Bottled pure ammonia for the cycle | $12 |
| Finished pond, projected | $2,529.72 |
Which puts the shape of it plainly: the fish are the cheapest part of a fish pond. Four of them cost less than two bags of paver base, against two and a half thousand dollars of hole, rubber, rock and plumbing to put them in — and the largest single line in the build, very nearly a third of the whole thing, is the $800 I paid to make a pile of clay go away.
Three things that went wrong
- A loose nut at the falls connection emptied roughly forty gallons into the ground and liquefied the clay at the waterfall corner. I did nothing about it, deliberately.
- The liner was badly centred — twelve inches spare on one side, four feet on the other. Cost: nothing.
- The water was opaque for weeks. It cleared on its own.
None of those were expensive, and the reason is that almost nothing in this build is permanent. Dry-set stone, a freestanding falls, an oversized liner and a grate that lifts out — every one of those choices buys the ability to be wrong once and fix it cheaply. On a first pond that is worth more than getting it right the first time.
The 232 gallons came from a traced photo
Every volume number on this page was measured with the tool on this site — one overhead photo, the outline traced, the real shape integrated rather than a box drawn around it. That is why Pond Tools exists.